Interacting with the new Apple TV remote
TL;DR - In simple terms the user can interact with Apple TV remote by pressing a few buttons, using the single-touch trackpad or the accelerometer.
Following from last weeks post by Nahuel, this post continues explaining our experiences with developing for tvOS. Specifically, covering the various available user inputs from the new Apple TV remote with an example demo project. Aside from the accelerometer inputs, which need a physical remote, everything else can be tried on the simulator. Generally speaking, it is possible to access most buttons on the remote and events on the Glass Touch surface (trackpad part of the remote). However, as of tvOS beta 3 the microphone on the remote is not accesible even though it would be very useful, for example for dictation.
Gesture recognizers
Currently, the gesture recognizers supported by tvOS are:
UITapGestureRecognizerUISwipeGestureRecognizerUIPanGestureRecognizerUILongPressGestureRecognizer
All the UITapGestureRecognizer events and the UILongPressGestureRecognizer can be used with the old remote since that remote can be linked to the new Apple TV.
Tap gesture recognizer example
To get the events from the buttons pressed on the Apple TV remote a UITapGestureRecognizer can be used, the Apple TV remote supports 7 different taps corresponding to the buttons on the remote or taps on a specific part of the remote trackpad (refered to as the Glass Touch surface) . The current supported press types (from the documentation) are:
public enum UIPressType : Int {
	case UpArrow
   	case DownArrow
   	case LeftArrow
	case RightArrow
   	case Select
   	case Menu
   	case PlayPause
}
For example, the UIPressType.Select would be set on the UITapGestureRecognizer to capture the select button pressed:
// Add the gesture recognizer
let tapGestureRecognizer = UITapGestureRecognizer(target: self, action: "selectTapped:")
let pressType = UIPressType.Select
tapGestureRecognizer.allowedPressTypes = [NSNumber(integer: pressType.rawValue)];
view.addGestureRecognizer(tapGestureRecognizer)

func selectTapped(tapGestureRecognizer : UITapGestureRecognizer) {
	// Handle select button tapped
}
Note that when using this on the simulator, the arrow taps can be triggered using the simulated Apple TV remote or the arrow keys from the physical keyboard.
Swipe gesture recognizer example
Detecting swiped on the trackpad part of the remote can be achived with a UISwipeGestureRecognizer, the current supported swipe types are the same as iOS, i.e. Right, Left, Up and Down. For example:
// Add the swipe gesture recognizer
let swipeGestureRecognizer = UISwipeGestureRecognizer(target: self, action: "rightSwipe")
let direction = UISwipeGestureRecognizerDirection.Right
swipeGestureRecognizer.direction = direction
view.addGestureRecognizer(swipeGestureRecognizer)

func rightSwipe(tapGestureRecognizer : UITapGestureRecognizer) {
	// Handle right swipe
}
Pan gesture recognizer example
The trackpad can be used to for tracking the relative position of the user’s finger. A UIPanGestureRecognizer is used for this, for example:
let panGestureRecognizer = UIPanGestureRecognizer(target: self, action: "userPanned:")
view.addGestureRecognizer(panGestureRecognizer)

func userPanned(panGestureRecognizer : UIPanGestureRecognizer) {
  // Handle pan translation
  let translation = panGestureRecognizer.translationInView(self.view)
}
Long press recognizer example
Long presses can only be detected on the select button since the api does not seem to allow to configure different press types as the UITapGestureRecognizer does. Hence, a UILongPressGestureRecognizer can be used to detect long presses on the select button, i.e. pressing and holding the trackpad button (or the centre button on the old remote), for example:
let longPressGestureRecognizer = UILongPressGestureRecognizer(target: self, action: "longPress:")
view.addGestureRecognizer(longPressGestureRecognizer)

func longPress(longPressGestureRecognizer : UILongPressGestureRecognizer) {
  // Handle long press
}
Other gesture recognizers
Even though they are described on the documentation I could not get the UIPinchGestureRecognizer and UIRotationGestureRecognizer, this may be due to the fact that they require multitouch, which is something that does not appear to be supported on the new Apple TV remote.
UIResponder events
Low level event handling is supported on the remote, meaning that UIResponder events can be used. The main caveat I have found is that there is no apparent concept of an absolute position of the user input on the trackpad. This means that regardless of wherever the user starts touching the trackpad, the original location will be the middle of the screen (960, 540).
override func touchesBegan(touches: Set<UITouch>, withEvent event: UIEvent?) {
  guard let firstTouch = touches.first else { return }
  let locationInView = firstTouch.locationInView(firstTouch.view)

  // This will always print x:960.0 y:540.0
  print("touchesBegan x:\(locationInView.x) y:\(locationInView.y)")
}
Accelerometer
If you were one of lucky ones to receive a golden ticket from Willy Wonka then you’ll be able to test the accelerometer on the Apple TV remote, otherwise you’ll have to wait a few weeks.
The first thing to do is get the Apple TV remote controller. This is done by listening to the GCControllerDidConnectNotification, once connected a var can be set to keep a reference to this controller and finally a closure can be defined to listen to the accelerometer changes. From what I have investigated it looks like only the gravity and userAcceleration can be observed.
import UIKit
import GameController

class ViewController: UIViewController {

  var controller : GCController?

  override func viewDidLoad() {
    super.viewDidLoad()
    NSNotificationCenter.defaultCenter().addObserver(
      self,
      selector: "controllerDidConnect:",
      name: GCControllerDidConnectNotification,
      object: nil)
  }

  func controllerDidConnect(notification : NSNotification) {
    controller = GCController.controllers().first
    controller?.motion?.valueChangedHandler = { (motion : GCMotion) -> () in

      // Whatever you want to do with the gravity and userAcceleration

    }
  }
}
This means that even though attitude and rotationRate are properties of the GCMotion object returned by the closure they are documented not to work, from the GCMotion header documentation
/**
 @note Remotes can not determine a stable attitude so the values will be (0,0,0,1) at all times.
 */
public var attitude: GCQuaternion { get }

/**
 @note Remotes can not determine a stable rotation rate so the values will be (0,0,0) at all times.
 */
public var rotationRate: GCRotationRate { get }
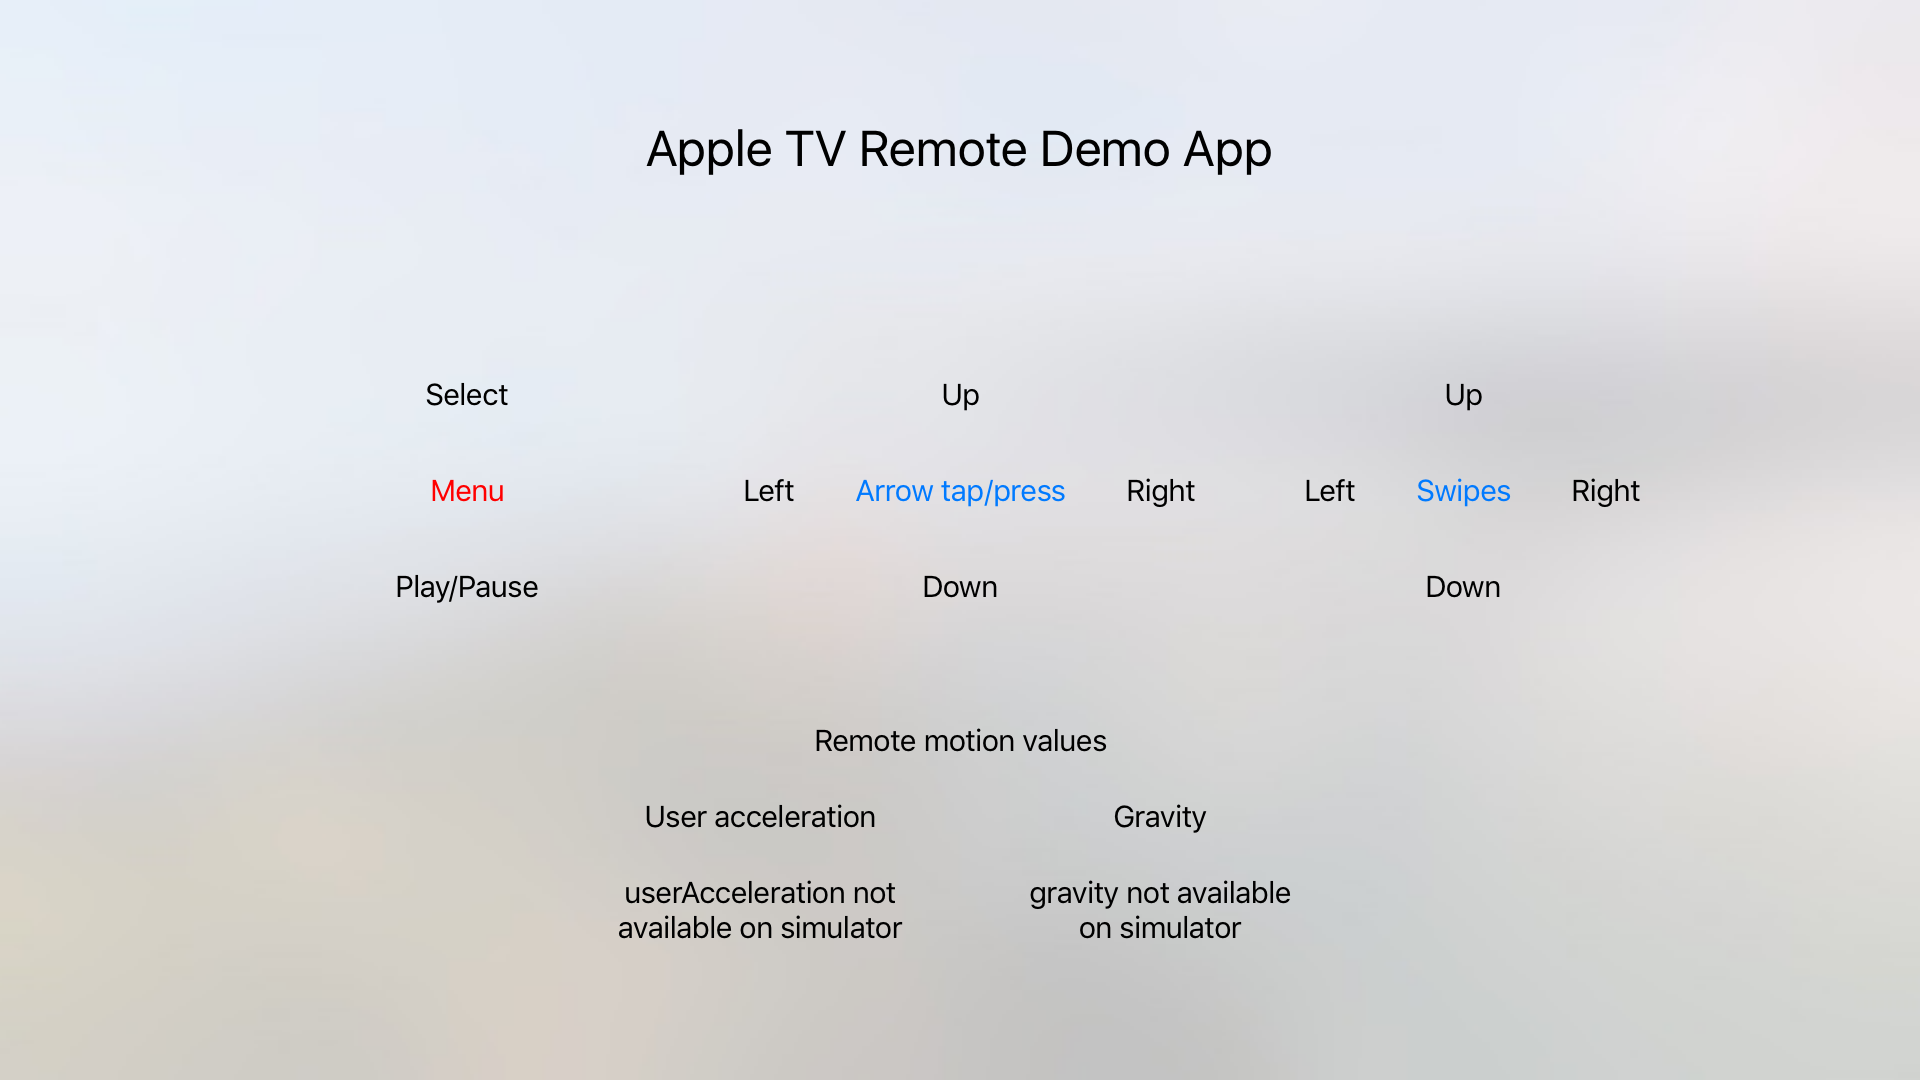
Demo app
To try out the various user input I’ve posted a demo app on Github. The project is very simple, it has one view controller where the various inputs to the remote can be tested. Depending on the user input a label flashes red to have a visual feedback that that event has been handled. Note that the motion values will not be available on the simulator as a physical remote is needed for those.