Storing your data on tvOS, part 2: CloudKit
In the first part of this series about data storage on tvOS, we’ve discussed using NSUserDefaults and iCloud KVS on tvOS. Today we’re going to go through a very brief introduction of CloudKit. As we discussed before, the Apple TV has rather limited local storage space. If you plan to store a significant amount of data (according to our Apple overloards that means more than 1 MB) you might want to check out CloudKit. The information about CloudKit is not tvOS-specific, so it should still be useful to you if you’re working on an iOS or Mac app.
The idea of this post is to briefly describe the CloudKit’s main features and workflow so you can then go on your merry way and try it out.
So what is CloudKit and why use it?
CloudKit is a BaaS (Backend as a service, like Parse) managed by Apple. It’s easy to use an low cost relative to other options. Just for being a rockstar member of Apple’s developer programme you get for free:
- 10 Gb Asset sotrage
- 100MB database
- 2GB Data transfer
- 40 requests per second
In the likely even that your app is an overnight success, you can go and purchase more storage to cover your ever-growing needs. It’s worth mentioning here that CloudKit does not make use of any of the user’s iCloud storage. In a sense, it’s separate from iCloud. It only uses the user’s existing credentials for authentication.
Getting started
Naturally, you first need to enable the CloudKit entitlement on your project. Go to the target preferences and click on the ‘capabilities’ tab. Turn on iCloud and then select CloudKit.
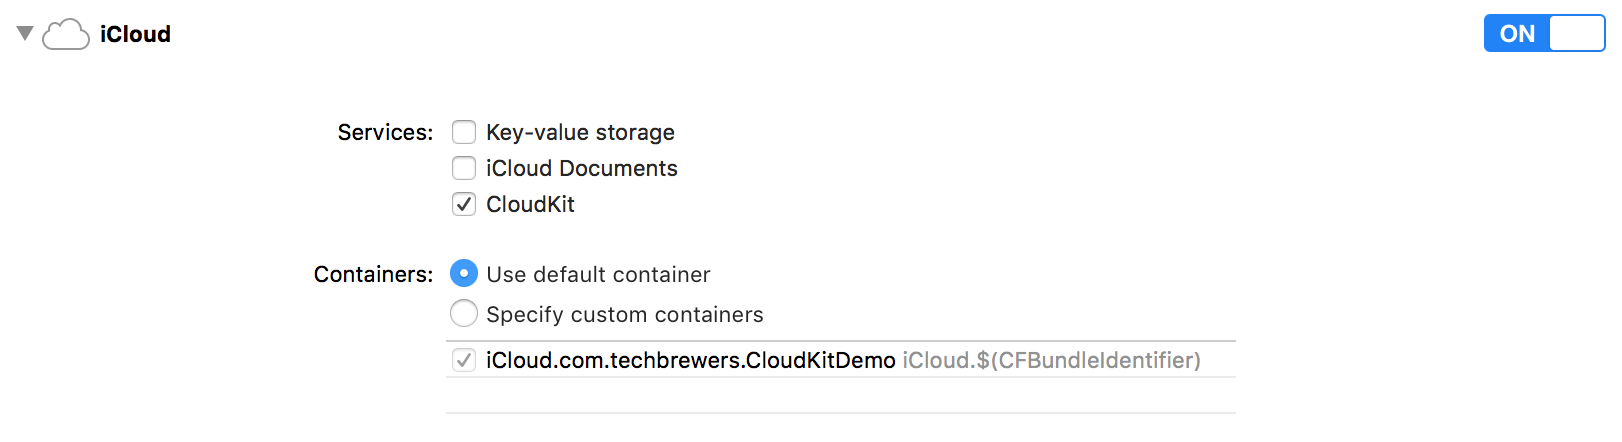
This will create a default container for you as well. You might be wondering, what the heck is a container?! Well, a container keeps your app’s records on the server. It’s essentially a grouping of databases. You might have there a public database that is shared and a private one which is user-specific for example.
The CloudKit dashboard
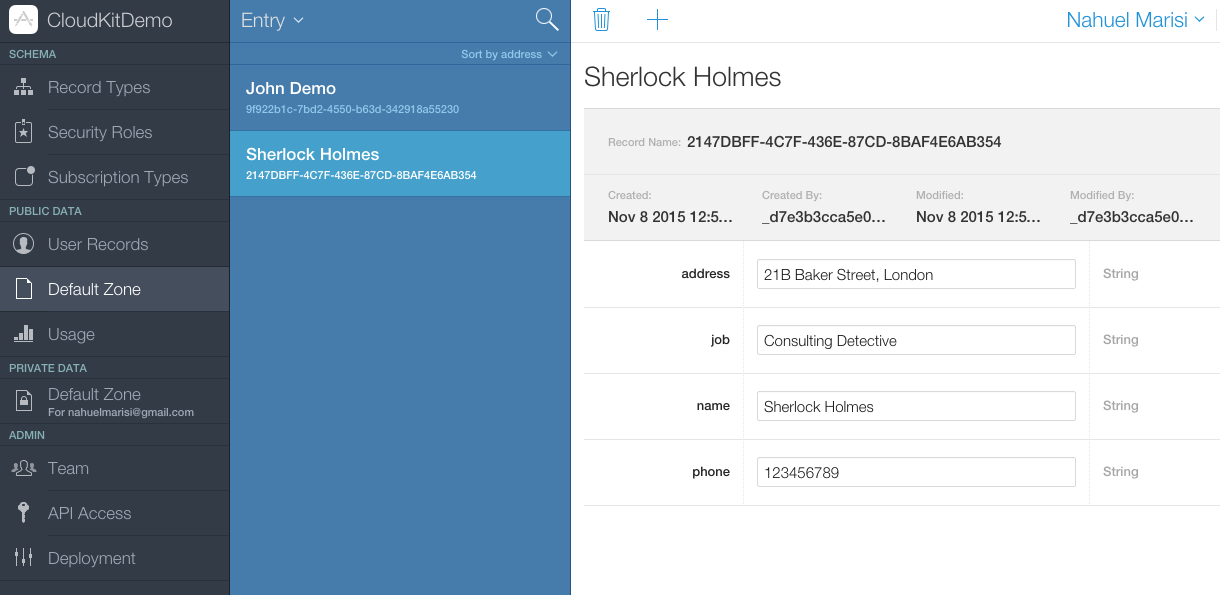
The dashboard is where you’ll be creating the records that your app will be using. You can click ‘CloudKit Dashboard’ in the capabilities pane to go straight to it.
You’ll see ‘Record Types’, ‘Security Roles’ and ‘Subscription Types’. In this post we will only deal with record types. If you’ve used other BaaS before you might be familiar with these concepts. If not, you can think of a record like a model class in your app. Essentially, a record type is a set of fields of various attributes. A record is an instance of a record type.
For example, if we had a phone book app, we might have a record type called entry that contains the fields name, address and phone number.

To create a new record type, select ‘Record Types’ under ‘Schema’ and then press the ‘+’ button.
Public and Private zones
CloudKit supports both private and public zones so you can have data that is in common to all users of your app as well as private data that is user-specific. When you create a new record, you can decide if it will be used for public data or private data by adding it to the corresponding section. For example, if we want to add a new phone book entry to our public data (let’s imagine this is a corporate phonebook so it must be available to all) we can follow the following steps:
- Go to the default zone under public data
- Make sure that the Entry entity is selected
- Press the ‘+’ button
- Fill in the fields for the new record and press save

A whistlestop tour of CloudKit’s API
There are various ways of accessing records in CloudKit. The two main ways of doing so are:
- Fetching individual records by record ID
- Using a query with a predicate to get a list of records
Fetching records by identifier
- In order to fetch records, we must first retrieve the public database in our container. In our case we’re using the default container.
- We need to create a CKRecordID object with our record name.
- We then call the ‘fetchRecordWithID’ method with our ‘CKRecordID’ obect.
//1
let publicDatabase = CKContainer.defaultContainer().publicCloudDatabase
//2
let phoneEntryID = CKRecordID(recordName: "9f922b1c-7bd2-4550-b63d-342918a55230")
//3
publicDatabase.fetchRecordWithID(phoneEntryID) { record, error in

	guard error == nil else
		return
    }
    print(record)
}
Fetching records by prediate
Fetching by predicate is very similar to fetching by identifier. The main difference being that we must create an ‘NSPredicate’ object that we can then use with a ‘CKQuery’ object. We then use our query object to peform a query on our database.
let publicDatabase = CKContainer.defaultContainer().publicCloudDatabase
let predicate = NSPredicate(format: "phone = %@", "12341234")
let query = CKQuery(recordType: "Entry", predicate: predicate)
publicDatabase.performQuery(query, inZoneWithID: nil) {
    recordsArray, error in

    guard let records = recordsArray else {
        return
    }

    for record in records {
        print(record)
    }

}
Saving and creating records programatically
Downloading data is all well and good, but what if you wanted your app to update the fetched records and send the changes back to CloudKit? Luckily for you, this is quite easy to achieve.
Each record is represented by a CKRecord object. It has the standard methods setObject:ForKey:, objectForKey, allKeys and changedKeys, you can use to update or add new fields. Once you’re done with your changes you simple call saveRecord:completionHandler: on your CKDatabase object. If you’ve retrieved the record previously, any changes will update the version stored on CloudKit. If you’ve create a new record, a new entry will be created instead.
Interestingly enough, if you set values for keys that were not originally defined in your entry, they will be added to your entry by CloudKit. This is a nice and easy way to change an Entity without having to go through CloudKit’s dashboard.
If this is all clear as mud, don’t worry, we’ll look at a simple example of creating a new entry in our ficticious phone book:
//1
let publicDatabase = CKContainer.defaultContainer().publicCloudDatabase
//2
let newRecord = CKRecord(recordType: "Entry")
newRecord.setObject("Sherlock Holmes", forKey: "name")
newRecord.setObject("21B Baker Street, London", forKey: "address")
newRecord.setObject("123456789", forKey: "phone")
newRecord.setObject("Consulting Detective", forKey: "job")

//3
publicDatabase.saveRecord(newRecord) {
    savedRecord, error in

    print(savedRecord)

}
- First we retrieve the database, in our case this is just the public database in the default container.
- We create a new CKRecord of type Entity and set the values for all the keys. Note that we’ve added a new key we hadn’t defined in CloudKit’s dashboard, that of “Private Detective”.
- We save our new record, and if all goes well the callback will return the saved record.
We can now see our new record on CloudKit’s Dashboard together with its new field, which is now available to all Entry objects.
Final words
We’ve barely touched the surface here. Think of this post as just the tip of the iceberg, the tree in the forest. As you can imagine, CloudKit has various notiifcations so you can keep track of changes that happen in the cloud. CloudKit is packed with a vast array of features to do with security, multiple user roles and so on. Furthermore, ‘CloudKit JS’ provides a javascript API if you need to use CloudKit from your webserver for example.
The idea of this tutorial is show you the basic workflow so you can decide if CloudKit is useful for you. The bottom line is that CloudKit is a sophisticated BaaS run by Apple. If your app is exclusive for tvOS or iOS devices and it requires a fair amount of storage in the cloud, then you should definately check CloudKit out.